How to Dominate Your Bent Over Row
- Dec 29, 2014
- 4 min read
If you go to gym, you'll see a lot of variations of the row being done. Barbell row, Bent over, Pendlay row, One arm db row, Underhand, Overhand, Neutral grip, Narrow grip, Wide grip, Super wide grip and as many as you can think of. Everyone's favourite seems to be the Barbell Bent Over Row, and for good reason. It's hard to find another exercise that kicks as much ass and looks as handsome as this one.

Perhaps, you do not need the box though
Unfortunately, seeing someone set up for this exercise for the first time can be less handsome and sometimes just painful to watch. Bent over rows require more than just back work, they require a tremendous amount of core contraction to keep you in neutral spine and not have your vertebrae hit someone maxing out on their treadmill intervals across the gym.
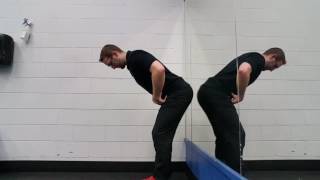
You might see a lot of this when you walk in:

Setting up in hyper-extension will leave you unable to contract your abdomen to support your spine, and could cause tearing in the abdominal wall with enough force or repetition under load
OR

Rounding...well, you might hit someone with the disc you just herniated from across the room
There are tons of reasons why people can't do this right, but let's not focus on that. Let's focus on making you do it right so your back can fill out that new Under Armour shirt you got for Christmas.
We need to have a stable core when performing this exercise, in order for us to keep a neutral spine while in a 45° position, we first need to know how to get there being completely horizontal and vertical.
So try these:
Front Plank
Dean Somerset - Quick tutorial on the set up
10 seconds of max contraction for 3-4 for sets should give you sufficient core contraction as a warm up or even "fillers" between sets
Front loaded farmers carry
(As it turns out, we forgot to edit the ending - enjoy!)
Now that we have all that down, we'll get our shoulder blades and upper back moving the way we want them to with these:
ITYW Raises
Scap Pull Ups/Machine Scap Pull Downs - to teach scapular depression (being able to pull your shoulder blades down)
Lying Overhand Band Pull - to help the shoulders and chest move more freely
Chest Support Row
You may notice that there is a lot of emphasis on how your shoulder blades move for a reason, if you perform rows like this:

Left: Bad/Right: Good
We end up Anterior Humeral Glide, which is a big no-no for your shoulder health. The bicep tendon (shown below) gets excessive wear and tear when the humerus is put into a forward position and is constantly overstretching and rubbing against bone.
This can cause micro-tearing in the bicep tendon and lead to anterior (front) shoulder pain and have you in the physios office doing rehab exercises for the next year with something that can be corrected in the gym without costing you $90 an hour.

Then we need to learn get hinging properly, here is a good baseline exercise to get those hips Bending like Beckham.
Hip Flow Series
Rack pull
Imagine that there is an invisible wall behind you that you are trying to touch with your butt. When you come up, your shoulder blades and lats are "packed" down into your mid back and the abdomen is pulled into neutral with your butt tucked in when you reach the top. So, butt out, butt in.
It's all well and good that we've got these things down better than our tax returns, now we're going to add them all together.
Let's go over the set up:
Stance width - how wide?
The stance generally comes down to shoulder width apart, depending on your body type and how long you femurs are you may need to widen your stance to sumo or modified sumo stance. Play around with it a bit and see what works for you and make sure that your knees and collapsing in towards each other when your rowing.
Grip - Overhand or under? And width?
Just outside of shoulder width is advised. Don't go so wide that you can't get the bar near your body.
Other than that, the grip is up to you the wider you go, the more rear delt and upper back work you get. The narrow underhand grip works better for lat engagement and mid back work. Going too wide (to the point where you drive yourself in to anterior humeral glide) would not be beneficial either.
Bend at your hip, not your back
This seems obvious, but still, make sure that when you bend over to perform the row, you don't allow your back to round. This adds a lot of unnecessary force to your low back.

Deadlift, but the same principle applies. Photo Credit: Bretcontreras.com
Start the bar from a hanging position over the knees and actually bend your knees.
Straight legging a bent over row is fine, if you have been lifting for a long time and can handle it. For the beginner to intermediate, l recommend a bent knee position. Have the bar no more than 1-2 inches from your knees, the further out you go, the more pressure is applied to the low back.
Keep belly button pulled in towards your spine
Core activation, all around, all the time when your doing rows.
Shoulder blades packed down and pulled in thoracic extension
As stated before, packing your shoulders "into your back pocket" as Tony Gentilcore coined it, is a great reminder to not allow your shoulder to roll forward to get extra distance on your row. If you can only get 3/4 of the way up before you starting rolling forward, stop there. Work on getting your chest and shoulder blades to move better and come back to it.
Row till your face explodes with handsomeness!
Si senor y senora.


Comments